


How Guide Pick Works
Guide Pick is an annual survey of active RMI Expeditions guides. In the 2025–26 cycle, 57 guides participated — representing guides across Rainier, Baker, Denali, and international expeditions. Each guide voted independently in 41 gear categories, identifying their top pick and explaining the reasoning behind it. Votes were tallied across both guide and client picks to produce the results in this guide. No manufacturer input was solicited. No product was included based on sponsorship. Every winner earned its place through field use.
Footwear
Approach shoes and Trail Runners are great for climbs with long (you guessed it) approach-es, which are plentiful here in the Cascades. They let you knock out those first few miles without putting on your warm, bulky mountaineering boots. We prefer lightweight approach shoes to hiking boots in case we need to store them in our pack after hitting the snowline.
"I bring this shoe anytime I think that I will have to walk on a dry trail before I get to a glacier or a ski approach - it sure beats walking 3 miles on dirt in your single boots. Also, you can just go trail running in it!"
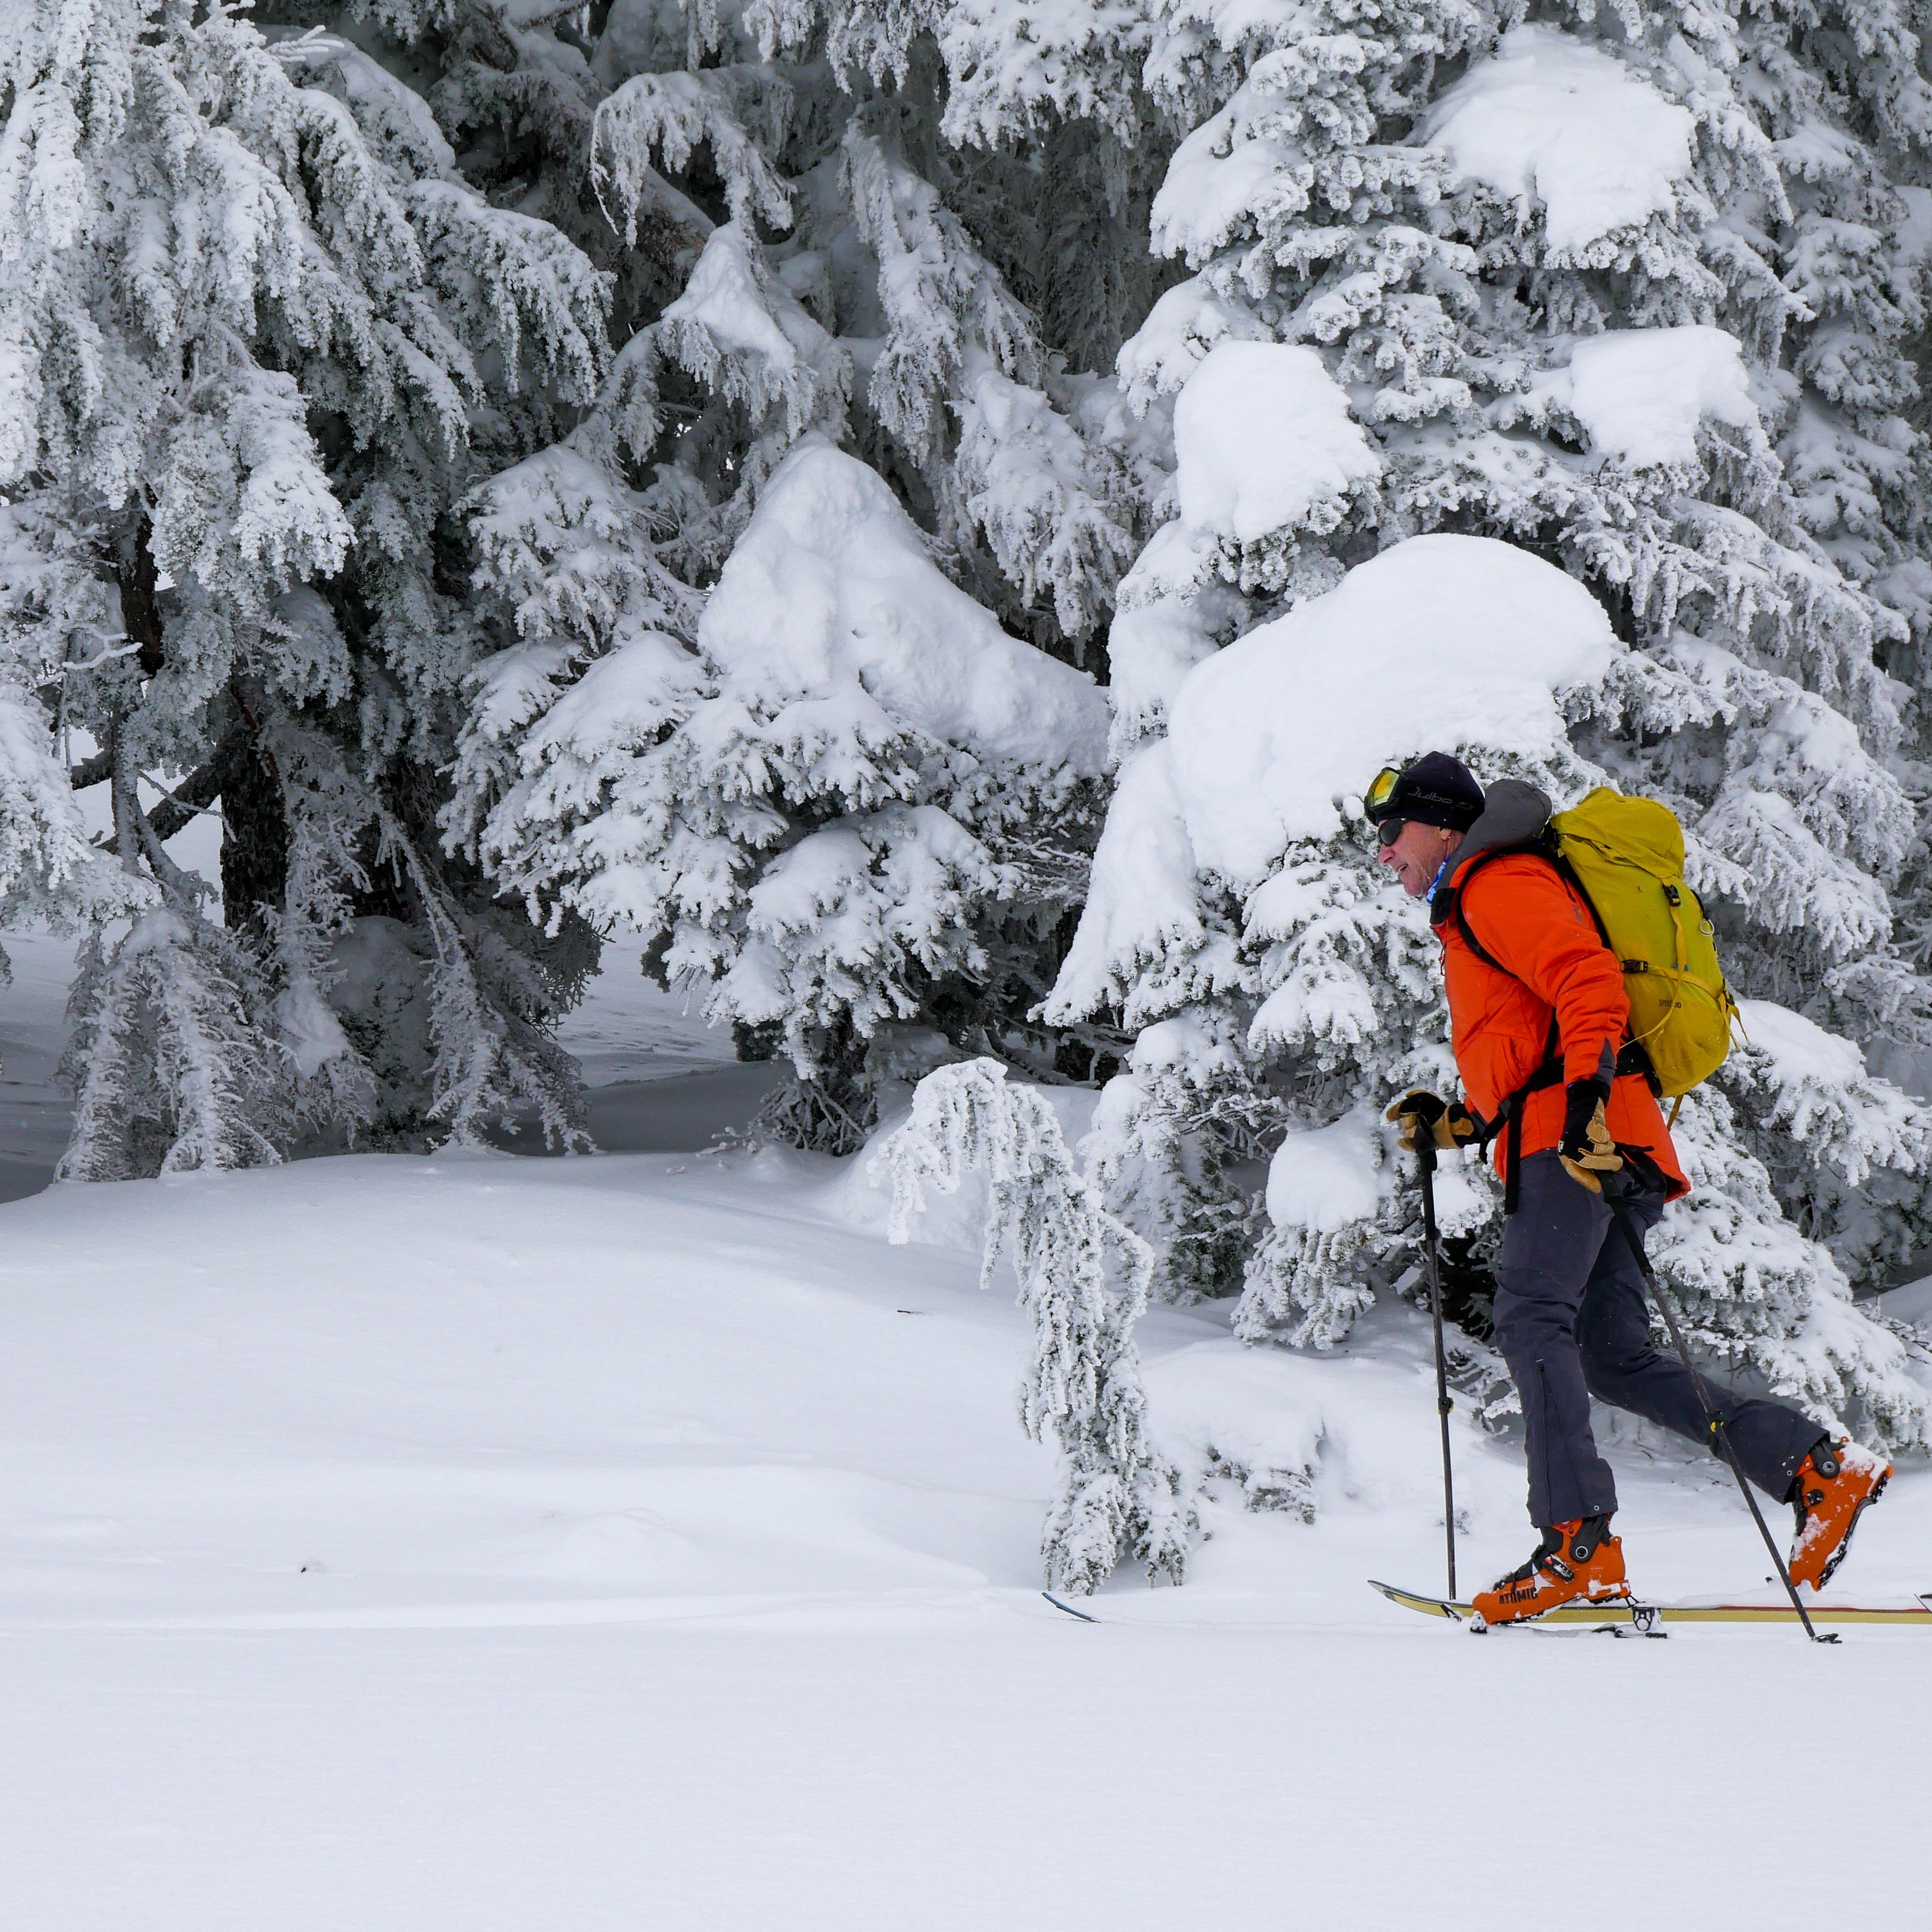
Single mountaineering boots are the workhorse of glacier travel and moderate alpine routes — stiff enough for crampon compatibility and front-pointing, warm enough for high camp on peaks like Rainier, and light enough to move efficiently over long approach days.
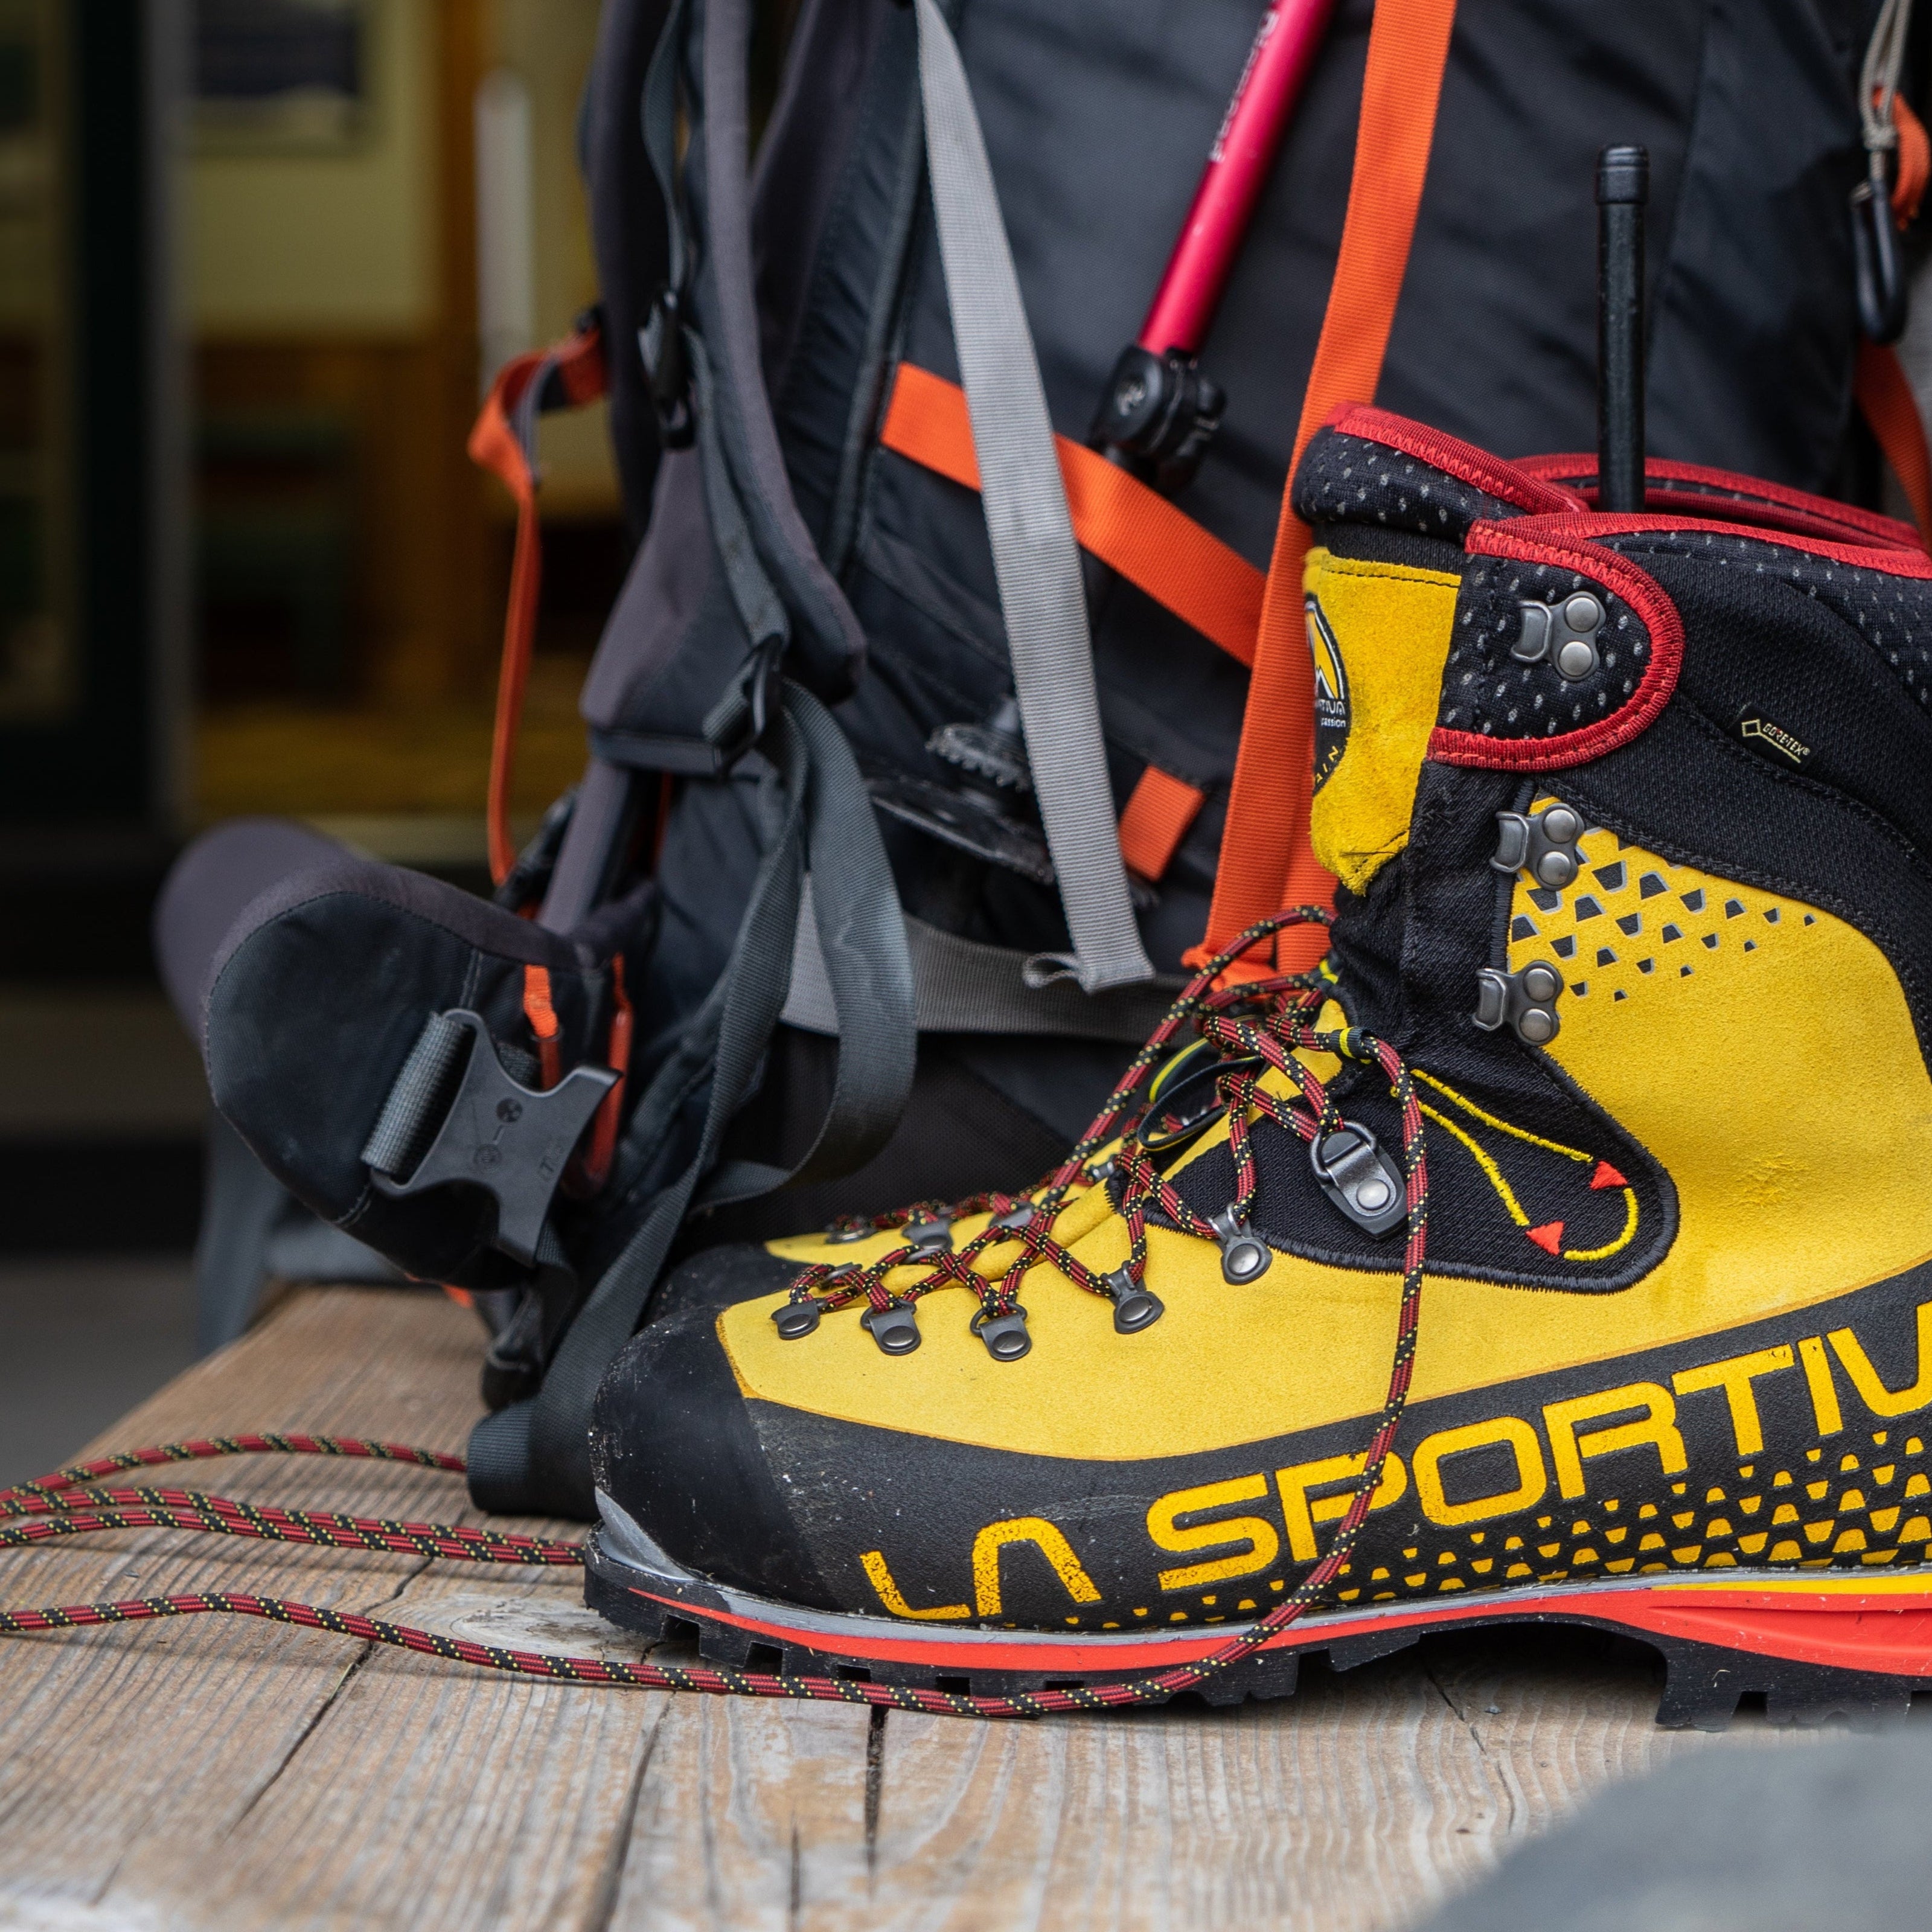
For climbs where temps will be lower or any kind of winter climbing, consider a double boot. Double boots consist of a removeable insulated inner bootie and a protective outer boot, usually with a built-in gaiter. Besides being warmer than single boots, double boots can also reduce blisters and hot spots. A removable liner is important for drying out the inner boots at camp.
Expedition boots are built for the highest and coldest objectives on the planet — Denali, Aconcagua in winter, or technical Himalayan routes. They prioritize extreme insulation, weatherproof durability, and the structural integrity to perform over weeks-long expeditions. These will almost always have a built-in gaiter for added warmth, and often utilize Boa tightening systems that are easier to use with bulky gloves than traditional lacing.
Gaiters come in handy when you're up high. Not only do they stop snow, rocks, and scree from getting in your boots, but they also keep everything below the knee tight and stream-lined to avoid accidental crampon snags. Your gaiters should have simple adjustments for tightening under the boot and around the calf. For most mountaineering, knee-length gaiters will be just fine.
Upper Body
Alright, you want the truth? Since the invention of Sun Hoodies and the advancement of good sweat-wicking technology, there isn’t much place for a non-hooded baselayer above treeline. The ability to protect your head and neck from sunburn, while still wearing an airy, breathable baselayer basically makes these obsolete. BUT, we still need something to wear below treeline right?
While other base layer options exist, we almost always recommend a sun hoodie. The material should have a "range" of temperature use cases - avoid ultra-light or super-warm options. It should also breathe well, wick away moisture, dry quickly, and if it is synthetic, be coated with an anti-microbial treatment to reduce odor. A generous fit that allows airflow and helps with ventilation is also key.
Your lightweight insulating layer should be just warm enough to insulate you against a light wind or to wear on a moderately warm alpine start. Since it will need to stack under your outer layers, go for a more "form-fitting" style than you would with mid-weight insulation or even a sun hoodie.
"I was wearing a lightweight hoody between my sun hoodie and vest on a Rainier climb this past summer. We got to the top of the Cleaver and the wind picked up significantly. Thanks to the softshell fabric on the fleece I didn’t have to change my layering and stayed comfortable until our next break."
When the lightweight layer isn't enough, the midweight insulating layer is what guides reach. It's the primary warmth layer for summit day on Rainier and the foundation of any expedition sleep and rest system. Breathability takes a back-seat to warmth here, and while water-resistant fabric is nice, your hardshell is your real protection against the elements.
Think of half a sleeping bag for your upper body. Just like with sleeping bags, down has a better warmth to weight ratio and packability than synthetic, but becomes less effective when wet. Go for at least 800 downfill power and 200 grams of insulation. A belay zipper is a handy option. Inside pockets keep gloves, snacks, and water from freezing.
"A good way to dry it out in putting it on top of your sleeping bag as you sleep - the heat from your body in the night will help to dry it out."
When "sleet hits the fan," you want your hardshell to be as bomb-proof as possible. We go by the "20/20" rule - at least 20 K mm waterproof rating and no more than 20 K grams of breathability. Some companies claim their hardshells can breathe AND protect you, but we'd rather reduce breathability with our layering system than risk getting soaked. Also, the jury's still out on pit zips... our opinion is pretty much split.
The windshirt is an underrated piece — ultralight, packable, and often enough protection for the high-output sections of a climb where a hardshell would be too warm and too heavy. Guides use them on ridge traverses, summit approaches, and any day when the sun is out but the wind is moving.
Lower Body
Baselayer bottoms work the same way as the top — managing moisture at the skin level on the way up and providing warmth at rest. On long climb days with significant elevation gain, the right baselayer bottom makes a real difference in how your legs feel over 10+ hours.
Climbing bottoms need to handle crampons, high-steps, and sustained movement over varied terrain while staying durable enough to survive the abrasion of an entire season. We look for knit-woven softshell material, which is usually breathable, water-resistant, and comfortable with or without baselayer bottoms. A narrow profile below the knee is important - baggy pants can catch on crampons. Deep, zippered hand pockets andn a thigh pocket are great additions as well.
Hardshell pants complete your weather protection system — keeping you dry on stormy ascents, shielded from wind on exposed ridges, and protected from wet snow during belayed sections. Just like with hardshell jackets, your hardshell pants should serve as your final layer of protection against all manner of bad weather. A fly is handy for both sexes, either for ventilation or relieving yourself.
Hands
The light glove is your dexterity layer — the one you're wearing when you need to feel carabiner gates, coil rope, or operate small buckles and zippers. On most summit days, you'll spend more time in light gloves than any other hand layer.
The medium glove bridges warmth and dexterity — warm enough for rest stops and cold approach sections, dexterous enough for basic rope work and self-arrest practice. This is the glove most clients wear for the majority of a Rainier summit climb.
"As soon as I expect weather to shift into a colder pattern, I dawn these gloves. I can always count on them to keep my hands dry and toasty."
The heavy glove or mitten is your protection against the worst your objective throws at you — summit wind, overnight cold at high camp, or a fast-moving storm on an exposed ridge. We prefer gloves since they offer a lot more dexterity, however in some extremely cold high altitude situations, mittens are the way to go.
Eyes & Head
Anyone who has spent time on snow will know that the reflection coming off the snow is almost as blinding as the sun itself. For that reason, most regular sunglasses won’t cut it. Glacier Glasses are designed to protect your eyes from all sides, as well as block 100% of UV light in bright conditions. Self-adjusting lenses will automatically brighten or darken depending on conditions, but if that’s out of your price range, just go for the darkest lens possible.
While Glacier Glasses will work during the majority of conditions, goggles can come in very handy in certain circumstances. High winds kicking up dust can wreak havoc on contacts even with the improved coverage of glacier glasses, and having a clear lens for night climbing will make your life much easier. Almost any goggles will work, and there’s no need to spring for pricey, multi-featured goggles you might see on the ski hill.
Your dome is important, give it the protection it deserves! Helmets should be lightweight, ventilated, simple, and effective. Look for a CE or UIAA certification to ensure it meets international safety standards. A good fit will ensure your helmet doesn’t slide back and forth on your head when whipping it around.
Alpine starts happen in the dark, and a reliable headlamp is non-negotiable. On a typical Rainier summit attempt, you'll spend 3–6 hours in darkness. Guides prioritize brightness, battery life, and simplicity of operation with cold, gloved hands.
Carry
In almost all the gear featured in this guide, minimalism is key. While some features (like attachment loops, waist straps, and ice axe holders) are important, many are just “bells and whistles.” We also recommend staying away from mesh pockets on the exterior of packs they can get caught and pull you off balance. Plus, they’re just not super durable.
"I like to completely detach the brain of the pack and use that space to hold my snacks and emergency gear. Then I store the brain at the top of my pack. Doing this makes getting into the pack much faster, which when climbing big mountains, makes all the difference."
We asked guides about both 50-65L and 65-70L packs because everyone is different. If you’re an experienced mountaineer with a highly developed sense for packing, a 50-65L is ideal for a 1-2 night summit climb. If you’re more of an intermediate or novice or care about your creature comforts, don’t try to stuff and scrimp to fit a smaller pack - you’ll be much happier with a 65-70L. Either way, look for a single compartment, lightweight frame, and solid suspension system that can carry 50 lbs.
Expedition packs are beasts, and rightfully so. You’ll need to fit almost everything you need to live in a harsh environment for 2-3 weeks (and still be able to lift the thing) so a lightweight aluminum frame, frame sheet, or aluminum stays to help distribute the weight of your monster load. Again, we recommend a limited feature set to save weight, but there are a few nice-to-haves like a removable brain to bring into your tent.
You wouldn't think there is much to a single-compartment duffel bag, but some brands just get it right. A durable, waterproof, or water-resistant fabric is key, given the abuse this bag will probably suffer on your expeditions, same with a strong, large, easy-to-operate zipper. Bags that can be carried as backpacks are nice, but keep in mind that they're going to spend more time on a sled or a mule's back than your own.
Sleep
The warm-weather sleeping bag covers Rainier summer climbs, lower-altitude alpine routes, and shoulder-season trips where temperatures stay above 15°F at camp. Guides value compressibility and moisture management alongside warmth for these use cases.
Some people run warm, others run cold, so we asked Guides to look at bags rated from 0-15F and 15-30F. Either way, you’ll have a choice between down and synthetic - Synthetic is better in wet conditions, but not nearly as lightweight and packable as down. Also, consider a longer bag to store inner boots and other things you don’t want to freeze (batteries, water bottles, etc.) at the bottom of your bag.
"I wear a pair of down socks while i sleep so I can use a slightly higher temperature bag to keep weight down and still be comfortable."
To sleep well on Denali or Everest, you’ll need a bag that’s rated to at least -20F. Down is better than synthetic on expeditions like these, given the better warmth-to-weight ratio and packability. A two-sided zipper is also a great option, so you can zip up to your chin from within the bag, and again, a longer bag allows room for storing items to keep them from freezing.
"Buy the long version. It gives a little extra room to comfortably store your boot liners inside of the sleeping bag on those extra cold nights."
Inflatable pads have advanced considerably over the years, but the Guides over at RMI still recommend an inflatable and foam combo if you’re sleeping on snow. The high R-value of hardcell pads means they’ll keep you toasty, while the comfort and light weight of inflatable pads make them worth carrying as well.
The closed cell foam pad is indestructible, always insulating, and doubles as a sit pad, emergency shelter, and pack frame. It's not as warm or comfortable as an inflatable, but it will never fail you when temperatures drop and stakes are high.
Shelter
The two-person bivy tent is the fast-and-light shelter option for technical alpine routes, storm bivys, and any situation where weight and packed size matter more than comfort. It's not built for extended camp living — it's built to keep you alive.
"In alpine conditions, always stake out your bivy tent fully — including all vestibule points. A tent that blows away in the middle of the night is one of the most serious camp emergencies."
The three-season tent covers the majority of alpine camping objectives — Rainier base camps, North Cascades multi-day routes, and international trekking approaches. It prioritizes livable space and weight balance for nights where conditions are serious but not extreme.
A true 4-season tent needs to do one thing exceptionally well: stand up to the worst weather you’ll face in the mountains. That means high winds, heavy snow loads, and subzero temps. Look for durable fabrics, a strong pole architecture, and minimal mesh to keep spindrift and cold air out. Vestibules and internal guylines are a bonus, but the real priority is stability, not luxury. These are survival shelters, not glamping setups.
"When we move camps on Denali it takes a long time to get camp set up. One of the most important and time consuming tasks is melting snow for water. Being able to run stoves in the vestibule saves a step and can get you off your feet faster after a hard move day."
Hardware
Unless you’re technical rock or ice climbing, you’ll likely spend much more time walking in your mountaineering harness than hanging in it. This means you can get away with less padding on your leg and waist loops. Adjustable risers allow for different types of activity as well, i.e. a higher tie-in point for better compatibility with a backpack’s waist strap. Be sure to look for an internationally recognized certification from an organization like the UIAA or CE is important.
Prioritize an aggressive pick shape for secure placements and consider modularity for adaptability across the ice and mixed routes. Opt for a tool with an ergonomic grip and a shaft that's T-rated for strength and durability, ensuring it fits well with your hand size and gloves. Weight and balance are crucial for efficient swings and reduced climber fatigue, so seek a well-balanced tool that enhances swing dynamics and feels like an extension of your arm.
General mountaineering crampons cover glacier travel, moderate alpine routes, and the standard technical terrain on peaks like Rainier and Denali's West Buttress. Ten or twelve points, step-in or hybrid binding, they need to attach securely and perform reliably across variable snow and ice conditions. If you have large feet, you may have to upgrade to a Long Bar to ensure they fit your boots.
Trekking poles reduce knee impact on descents, assist balance on glaciated terrain, and can be configured as probe poles for crevasse detection and snow shelters. Guides use them on long approach days and recommend them to clients across nearly every objective.
"If you are winter camping with a creek around that is hard to get to, hook a carabiner to the basket side, and an open nalgene, and hook the connector part of the lid to the bottle to the carabiner, and then you can 'fish' with the carabiner to get water!"